Friday, August 22, 2008

Spinach Soup


I wanted to serve something in a cute little white bowl that I recently bought. The first thing came to my mind was a colorful spinach soup which is full of nutritional value as well as rich flavor. Every time I make this soup I use different recipe, the reason is I don't remember the recipe I used last time. It's funny, because I make this soup all the time, at least once a month or so...:)

So this time I am documenting it down so that I won't forget it. Although I kind of like the newness of this recipe every time. So I guess I might document it today in my blog, but I don't think I would be using it next time.

Whatever, here is how I made my favorite soup-:

Heat some unsalted butter in the pan, add chopped onions fry for a minute and add 1 chopped potato to it, add half a cup of vegetable stock and and half a cup of 2% reduced fat milk( I used 2 % , you can certainly use whatever you have on hand.) Bring it to a boil. Allow to cook for about 10 minutes on a lowered heat.
Add cut spinach leaves, keeping aside few leaves to add later when you blend the mixture.
Add 2 cups of stock to it. Bring it to boil. Allow to simmer for 10 more minutes with a lid on it.
Allow the mixture to cool down, before you blend that in a mixture.
When you blend the mixture, make sure you add remaining spinach leaves. This will give your soup nice green color.
Return the mixture to the pan heated with little more butter. Heat the mixture, add some salt, sometimes I add crushed cumin seeds that gives nice fresh taste to the soup. But you can skip that. Do not allow the soup to boil. Serve in a nice plate garnished with spinach leaves and some Parmesan shaves or any grated cheese.
Enjoy......:)

Coming Up: Black and White Cookies

Saturday, August 16, 2008

Roasted potatoes and onions with rosemary

Ever since I worked with basil, I am in the mood of using herb in to one more dish. This time it's rosemary and this time it's not for any event. I saw this really simple yet tempting dish on food network. Ohh.... I love food network. I love Rachael ray's 30 minutes meals. I think it's a very smart idea to show people that cooking is not really very complicated if you pay little attention to it, just like you do at your job. I loooooooove Giada's Everyday Italian. She shows some fancy looking but not so complicated dishes. It just makes me inspire to cook more and more and more!!
Food network is full of food choices. But I try to stick to the healthy yet tasty dishes, just like the one that I am going to share with you all.

So it's oven roasted onions and potatoes with lots and lots of rosemary.

This is a dish you can make with only 6 simple ingredients that you can find in your regular grocery store any time of the year.

6-7 baby red potatoes(Scrubbed and halved ), you can use white if you want, but red potatoes and white onions add a nice color to the dish. So I used red.
1 8 oz. packet of cippolini onions( peeled) - these are cute little white onions.
1/4 cup of extra-virgin olive oil
dried rosemary- around 2 teaspoons
black pepper
salt

It's alright to use dried rosemary here because we are going to roast it in the oven for about 30-40 minutes.

For peeling the onions a simple trick is heat some water and put onions in to it for about 2-3 minutes, on a medium to high heat. Drain the water and it will be more easier for you to peel the onions.

Now toss all the ingredients( peeled onions, halved potatoes, olive oil, rosemary, salt and freshly ground black pepper) together. Mix it with your hands. Spread on a baking sheet.

here are those tiny little guys ready to go in to the hot tub.....:)


Heat the oven to 400°F. Keep it in for about 30-35 minutes. Turn them once after 15 minutes to make them crispier on both the sides. Your nose will know when they are done.

Enjoy........:)


Coming Up: Spinach Soup

Wednesday, August 13, 2008

Vegetable puffs with basil- An entry to Herb Mania

Alright I really loved this idea. Herb mania- Any vegetarian dish you are allowed to prepare using specific herb, this time it was basil. I was sooooooo excited to read about this event here. I love herbs. There are so many different types of herbs available around, with culinary as well as medicinal values attached to them. One of my favorites is basil.

So little bit about why I decided to go with this one. I wanted to work with puff pastries for a really long time. This recipe came to my mind when I was going through one of stack of cookbooks I have. I thought this might be the right time to use the recipe from the book and add couple of ingredients to make it more tastier.

So I started with picking up the fresh basil first, of course what would I do without that. I bought puff pastry and paneer. Yes this was the one of the ingredients I decided to add.

here is what I used:-
  • Onion chopped
  • Garlic chopped- 1 clove
  • carrot- Just half- medium sized
  • A small potato
  • A palm full of peas
  • 1/2 a cup of vegetable stock.
  • a really good amount of fresh basil leaves.
  • And one egg lightly beaten.
I started with a some oil in a pan, added garlic and onions. I added some salt after onions, to bring out sweetness from the onions. This way onions gets evenly cooked. Then I added carrot and potato. After adding vegetable stock in the pan I lowered down the heat and simmered it for 10 minutes, until the stock got entirely absorbed by the vegetables cooking them completely. Add little more salt as per taste, and some red pepper flakes. And the lastly I added the peas and the paneer and basil leaves. I crumbled the leaves with my hands and added in to it. Kept it on the stove for a minute more and that's it. This was my mixture to stuff in to the puffs. One thing to remember here is basil is the last thing you want to add, because it will loose the flavor if you add them early in the preparation.

Now it was the time to deal with puff pastries. As I said this was my first time to use them. I was a little nervous. But they were more perfect than I expected. I wanted to make rounds out of it and then fill in the mixture and fold them in to a half circle. But I ended up by making square and folding them in half. It was more easy to handle. I bordered the cut sheet with water, added a spoonful of mixture in it. After folding it, sealed the edges. Brushed the beaten egg on the both sides of the puff.

And then I spread the oil in the baking pan and layered the puffs on it. Heated up the oven on 415o F. Left those puffs for about 20 minutes. And the result was great.
Beautiful golden puffs with aromatic basil in them. They were just perfect.

To make them more perfect I made a gourmet sauce, which was even more delicious.
Try it and you will love it.

Ingredients for sauce-
  • 2 tomatoes, peeled and chopped
  • some onion chopped
  • 1/4th cup of wine (I used red here)
  • 1/2 cup of vegetable stock
  • 2 tbsp tomato paste
  • dried basil
  • dried oregano
I started with heating some olive oil in a pan, added some onion and tomatoes. After a minute added wine and vegetable stock. I boiled the mixture and simmered it for 15 minutes and allowed to cool. Then I made a puree out of it and returned it to the pan. Then I added the tomato paste and dried oregano and the dried basil. A little bit of salt and it's ready. The sweetness of tomato and the sourness of wine was great together.
You can serve the sauce hot or cold.


The combination was way too perfect. My idea of adding basil in to the puffs was worth it. A little hint of basil at the very end of every bite. Neither too much nor too less.
So try these once. They are really fun.
Lets grab a plate and enjoy while they are hot.

This is how they look from inside:-


Coming Up: Rosted onions and potatoes with rosemary

Tuesday, August 5, 2008

Blueberry Yogurt Muffins

This one is my entry to the Sweet and Simple Bakes Monthly Baking Event, hosted by Rosie and Maria

Thank you Rosie and Maria for hosting this wonderful holiday season baking event for beginner bakers like me...:)

                                                                 Please Feel Free to Add our Badge to Your Site

I am not a baker. In fact it was just 2/3 months back, when I started to think about baking. The credit goes to my co-worker Ivy from little Ivy cakes. She inspired me to start baking, and not just baking but also for this blog. HOW???? Check out her blog and you will know.
She has some really delicious recipes, that you will feel you should try.

Baking is not a part of regular Indian cooking. Baking takes place on a really large volumes for making cakes, pastries or different kinds of breads and biscuits in the bakeries in India. During last 10-15 years or so people started buying small ovens for making cakes at home.

So here is my second attempt of baking.
First time I baked was the oatmeal bran muffins, by using the recipe that was on the Quaker oatmeal bran packet. They turned out well. One thing I loved about baking is you have to be precise with the quantity of ingredients you are putting in and you are good. There is no room for eyeballing things. This was really hard for me to begin with. I am very comfortable eyeballing stuff. My mother always cooked the same way. I guess that's true for most of the Indian cook. But again you are good eyeballing when you are making food for a few people.

So this one is the inspired recipe from Bunny's warm oven. Which is inspired from Stonyfield farm. As I am a newbie to baking, I could not make much changes in to the recipe.

Here is what you will need-:

2 cups all-purpose flour
1 teaspoon baking soda
1 teaspoon baking powder
1/4 cups sugar
1/2 teaspoon salt
1 teaspoon cinnamon
2 eggs
1 1/4 cup plain yogurt
1/2 stick of butter, melted
1 tablespoon lemon zest, grated( I used lime zest)
1 cup blueberries, fresh or frozen

I used fresh blueberries. I love Costco for the fruits. I love fruits in a large quantity. They are never too much for me. I am a regular Costco shopper for apples, oranges, blueberries, blackberries, and strawberries. I love them all and they never go waste on me.
So this time I decided to use my blueberries and make these muffins.

Blueberries are high in fiber and low in saturated fat, cholesterol and sodium. It's all good right?
Not just that, blueberries are full of antioxidants which prevent cancer causing cell damage and limit age related diseases. So there are reasons why one should eat as much blueberries as they can.

So you should start with mixing the dry ingredient -the flour, baking powder, baking soda and salt in one bowl.
In other bowl combine the eggs, melted butter, yogurt,sugar, cinnamon, lime zest. Mix them nicely. Now mix dry ingredients in to this mixture and just mix until blended. Do not over mix it.
Now add the blueberries in to it and just mix it once.


Preheat the oven to 375ºF . Spoon the batter in to each muffin cups, filling each cup about two thirds full. It will be done in 15 minutes. They should be brown on top. You can check by inserting a fork or a knife in the middle of the muffin, If it comes out clean, your muffins are ready.
Allow them to cool , and then remove and serve warm.


My muffins turned out great. The only thing was the sugar. Some more sugar would have been fun.

Coming up: An entry to an event - Herb mania

Saturday, August 2, 2008

A really simple pasta!!


Pasta is one of the dishes, I like to make anytime of the day. What I like most about pasta dish is it's so versatile, that you can really be creative and can make thousands of your own different versions. When I make pasta just for me and my hubby, I try to make it healthy by adding as much vegetables as I can, and by using wheat pasta. I live the variety of wheat pasta you get in Trader Joe's.
As a party menu, I go little beyond my healthy instincts and try to make everyone happy.

So here is one of the healthy kinds I make for just me and my hubby..:)

So you can use pasta of any shape you like. This time I used the one you get at Costco. It comes with a pack of 6 , 1LBS each. There is a combination of radiator and Fusilli or combination of other varieties.

I used radiator for this pasta.
I cooked pasta in a boiling water with some salt in it. If you are using less amount of sauce or a homemade sauce, then this is the only time to add salt to pasta, so that pasta can absorb the flavor. Cook the pasta until it reaches to al dente.
Before draining the pasta, keep a bowl of water aside, to make the sauce later.
Now drain the pasta and keep it aside.
While you are boiling the pasta you can work on sauce and and the vegetables you want to add in pasta.
I don't measure the quantity for making the pasta, usually half a pound pasta is enough for 2 people for a lunch or the dinner. I just eyeball the vegetables and the sauce. My experience tells me that it never goes wrong. There is nothing to go wrong in this delicious dish.

So cut onion, green beans, red bell pepper, yellow bell pepper, sweet pea pods and broccoli. Asparagus goes very well with pasta.
Chop all the vegetables.

Heat some olive oil in the pan. Add chopped garlic, around 2-3 cloves. Fry for a minute, and add onions. I use dried Italian seasoning. Sprinkle it on onions, mix well. Then add remaining vegetables one by one. After adding all the vegetables, add the water from pasta that we kept aside. What we want to do is, cook vegetables in such a way that it will maintain it's crunchiness.
So add about 1/4 cup of water and cover the pan with the lid until the vegetables are partially cooked. Now it's time to add sauce to the pasta.

This time I bought the pasta sauce from Costco. It's homemade style marinara with imported Italian plum tomatoes and Napa Valley Cabernet.

It's delicious. A perfect combination of wine and tomatoes in to your meal. Again while adding the sauce just eyeball it. I added about a cup and a half I guess. Mix the sauce well with all the vegetables, take some help from remaining pasta water. Now add your pasta to the pan. Make sure that your sauce coats the pasta very well. Keep it on medium flame for couple of minutes more, and add shredded Parmesan cheese. Turn off the heat and serve hot sprinkling some cheese on top.

As I said, a simple pasta recipe never goes wrong. So doesn't matter whether you are a master cook, or a beginner, or someone who likes to experiment just like me...:)
You can never go wrong with this dish.
It's the simplest and the healthiest.

You got to try this out.
Enjoy!!!


Coming Up:- Blueberry yogurt muffins


Friday, August 1, 2008

Vegetable Manchurian and Jeera Rice


An- Indo- Chinese Cuisine

Not many people out side of India know that this type of cuisine does exists. It's a very unique Chinese cuisine with an excellent Indian touch to it. I love it from bottom of my heart. Of course it's spicy, but the beauty is you can always control the spiciness when you are cooking it at home.


That's one of the reason I love to cook food at home, I can control the ingredients, the spiciness, and almost everything. Indo- Chinese food needs lot of time and and lots and lots of preparation.
But it surely is worth the effort.

There are no Indian restaurants around Los Angeles that serves Indo- Chinese cuisine. There is one in Artesia, but it's nowhere close to good. San Francisco is the place where you can see some of the Indian restaurants serving Indo- Chinese food. Last time I had it in the restaurant was about an year ago..sometime in May 2007. So whenever I am craving for Indo-Chinese Cuisine, I try to cook it at home.

Let me describe about the dish a bit.

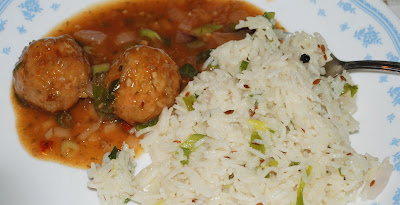
The dumplings in the recipe are made with the different kinds of vegetables, dipped in the manchurian sauce. It looks similar to meet balls. But tastes totally different.

I usually make this dish from scratch. But this time I took a little help from the Indian Store. I bought manchurian sauce powder from the store. I made dumplings from scratch though.

For manchurian dumplings you will need-:

Vegetables like cabbage, carrots, cauliflower, green beans, red bell peppers. You can use the vegetables of your choice. Cabbage is a must though.
Black pepper powder- 1 tbsp
Cornflour
3-4 green chillies- chopped
Spring onion- chopped
Soy sauce
Chili paste
Ajinomoto- I know it's not a healthy ingredient to be part of your diet, but a little goes really long way, so just add half a pinch to give your dish an Indo-chinese flavour and texture. I feel bad whenever I use ajinomoto in my food, since it is a carcinogenic ingredient, but guess what I try to eat broccoli at least 3 times a week anyways, which is proven to be a cancer fighting vegetable. So the key is to balance your eating habits.
Salt to taste.

and last but not least 1 cup boiled rice. Rice helps to bind all the ingredients together while making the dumplings.

So for manchurian dumplings, you need to start with shredding all the vegetables you have on hand. I used cabbage, green beans, carrots, cauliflower. Bring 2 cups of water to boil, and add all the vegetables to it. Cover it with a lid, and keep it for a couple of minutes on a medium heat. Drain all the vegetables on a cheese cloth. Make sure that you squeeze out all the water. Save the water for making manchurian sauce later. You can use the water as the vegetable stock.

Mix together all the shredded vegetables in a large bowl, add salt and very little ajinomoto to it. Add green chillies, black pepper powder, chopped ginger, soy sauce, chili paste,spring onions and some cornflour. Last ingredient to add in those dumplings would be mashes boiled rice.
Now make small dumplings of a size of tennis ball.
Heat some oil in a pan, and deep fry those dumplings until they get nice golden brown color.

As I mentioned before, I took a little help from the Indian store for making the manchurian sauce. I bought Knorr manchurian sauce packet, and just went according to instructions on the packet. In 4 cups of water, I added the powder from the packet, and on a medium heat, I kept on stirring continuously until it reaches to a boil.

Add the dumplings in to the sauce before serving and heat them for a couple of minutes.
Your vegetable manchurian is ready.
Serve hot with Jeera rice.
Recipe for Jeera rice goes like this-

1 cup of basmati rice
3 tbsp. jeera that's Cumin seeds
2-3 Black pepper whole
2 cardamoms
1 stick of cinnamon
1 bay leaf
Some Olive oil

If you want you can add some spring onions to the rice, or you can simply stick with nicely chopped onions.
I usually add spring onion for the great flavor and to add some green color in my rice.

Wash basmati rice 2 times in water. Drain it and keep aside.
In a pan heat some olive oil, add cumin seeds. Cumin seeds are the essence of this rice so add as much as you want.
When cumin seeds splutter, add cardamoms, cinnamon, black pepper, bay leaf. Fry them for a minute and add onion to it. fry for another couple of minutes, and then add washed basmati rice to it.Also add spring onions at this time. Fry for 1 more minute and now it's time to add water. Watch out for the quantity of water.
Usually when you cook rice outside of a pressure pan, like the way I cooked for this recipe, the quantity of water should be double than the rice. I used 1 cup of rice, and added 2 cups of water to it.
Add salt as per taste.
After adding water, bring the water to a boil on medium to high flame, then cover it with the lid and lower down the heat. Keep it on the lower heat for 15 minutes.
and your Jeera rice is ready.

The Jeera rice and vegetable manchurian is a great combination. Try it sometime.


Coming up: A really simple pasta!!